|
POLLY PORTABLE
HOW TO OPERATE THE POLLY |
||||||||||||||||||||||
 |
||||||||||||||||||||||
 |
||||||||||||||||||||||
 |
||||||||||||||||||||||
|
FIGURE C
|
||||||||||||||||||||||
|
FIGURE B
|
FIGURE D
|
|||||||||||||||||||||
|
Click center image to download pdf (359 k) |
||||||||||||||||||||||
 |
||||||||||||||||||||||
 |
||||||||||||||||||||||
|
FIGURE A
|
FIGURE E
|
|||||||||||||||||||||
|
|
||||||||||||||||||||||
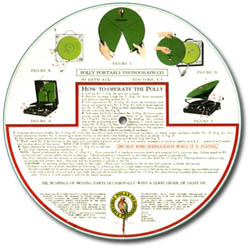
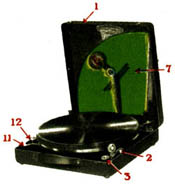
| 1. Lift lid No. 1 (Fig. A) and lay it aside.
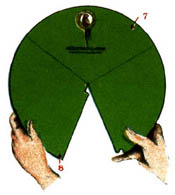
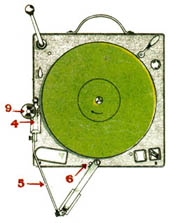
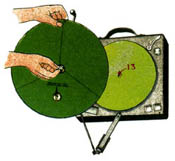
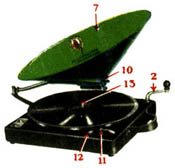
2. Remove winding crank No. 2 (Fig. A) from container and place in winding socket No. 3. 3. Lift reproducer No. 4 (Fig. B) from its container and swing out support arm No. 5 (Fig. B) until it stops against pin No. 6 (Fig. B). This is very important. Phonograph should now look like Fig. B. 4. Now take the Polly Oscillator No. 7 (Fig. A) from under spring inside the lid., and form it as illustrated in No. 7 (Fig. E). This is done by holding the notched side as flat as possible and slipping V notch around eyelet No. 8 (Fig. C), then pushing notched side as far as it will go between the edges of the pocket on the opposite side. Trade Mark must be on inside of oscillator. 5. Unscrew aluminum holder No. 9 (Fig. B) from the reproducer and mount the formed oscillator on black metal oscillator holder No. 10 (Fig. E); then replace aluminum holder No. 9, screwing it down firmly, at the same time holding the oscillator as shown in Fig. D. 6. Put needle in reproducer as usual. Phonograph is now set up for playing and should look like Fig. E. 7. Wind crank No. 2 by turning to the right until turntable starts to move. It is not usually necessary to wind so tightly, and a little practice will enable one to stop short of this point. WIND FOR EVERY RECORD! 8. Start machine by moving brake arm No. 11 (Fig. E) to the left. 9. To close machine, reverse operations 1 - 6. |
||||||||||||||||||||||
|
||||||||||||||||||||||
| NOTE: Speed is adjusted at knob No. 12 (Fig. E). Turn towards F if machine runs too slowly and towards S if it runs too fast. Adjust speed to 80 revolutions per minute while record is playing. Check adjustment frequently to see that proper speed is maintained.
Six 10-in. records can be carried on turntable, as shown in Fig. A, by slipping them over disc shaft No. 13 (Fig. E). Placing direction card on top of records will protect them. Records will be scratched if placed in the lid. CAUTION: In winding always turn crank to the right. Never turn turntable to the left as this will unhook or break the spring. Oscillator must be carefully handled as distorting or softening due to rough usage impairs the playing. Should turntable be loosened in shipping, put brake in running position - that is, move to left as far as it will go - then tap turntable several times with a block of wood and a very light hammer all around the disc shaft No. 13 (Fig. D), thus forcing turntable back on its tapered seat. Once it is well seated it will not be easily loosened. OIL BEARINGS OF MOVING PARTS OCCASIONALLY |
||||||||||||||||||||||
 |
||||||||||||||||||||||